Nothing says cuddly like a kitty on the couch, even if that kitty is a pillow!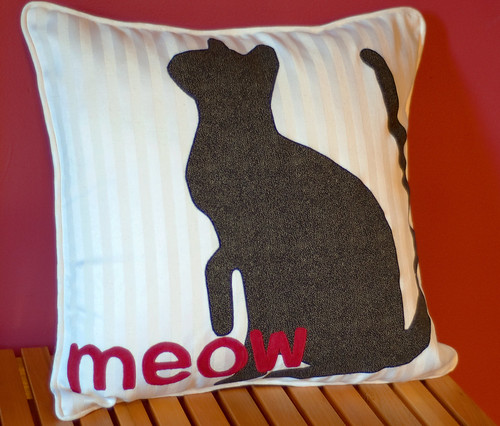
I drew up a diagram so you can make one of these too! Actually, there are a lot of ways you could use this diagram to make this pillow (painting, stenciling, reverse applique, regular applique, silkscreen, etc.) So if you have an idea, download either the regular or reverse diagram (sized for an 18 inch square pillow) and have at it! If you want to make one like mine, keep on reading for both a sew and no-sew version...
Cat pillow diagram
Cat pillow diagram REVERSE
Applique Cat Pillow (Sewing Version)
Supplies:
18 inch pillow form
Fabric:
3/4 yard for background
1/2 yard (or a piece at least 15 inches x 20 inches) for cat
1/4 yard (or a piece at least 4 inches by 12 inches) for letters
fabric as necessary to finish back, make piping, etc. (will vary based on how you finish the pillow)
Supplies:
Sewable Iron-on adhesive (I used HeatnBond Lite)
Coordinating thread
Closures for pillow as desired (buttons, zipper, etc)
Printer, tape, and a pencil
1) Cut 19 inch square from front background fabric.
2) Print out the cat pillow diagram REVERSE. The final pillow is 18 inches square, so you will have to print in sections and tape together. Every printer is different, but you will probably have to set "page scaling" at zero, select "tile pages," and set an overlap, such as 1/2 inch. (If you have troubles, send me a message and I'll try to talk you through it!)
3) Trace the cat onto the paper side of the iron-on adhesive. Cut out leaving a wide border around pencil lines. Repeat for each letter.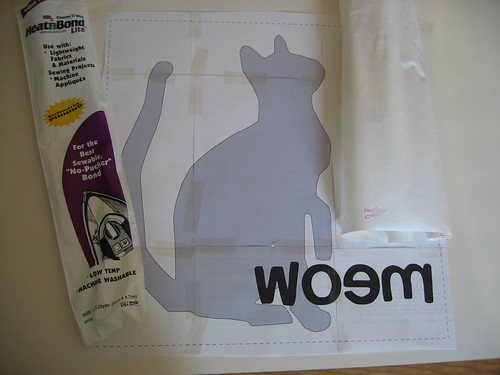
4) Place the traced cat iron-on adhesive on the WRONG side of fabric for cat. Press with iron to activate adhesive as directed on package. (from my package: silk setting, 1-2 seconds) Let cool, and then cut out cat fabric on pencil line.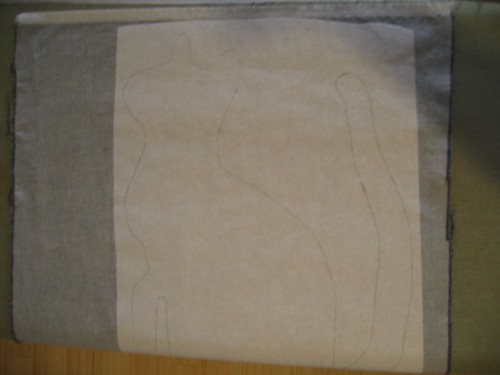
5) Remove paper from cat iron-on. Using diagram as a guide, place cat iron-on on background fabric. Press iron to adhere as directed on package.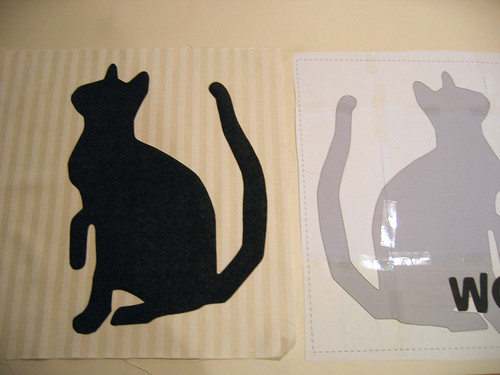
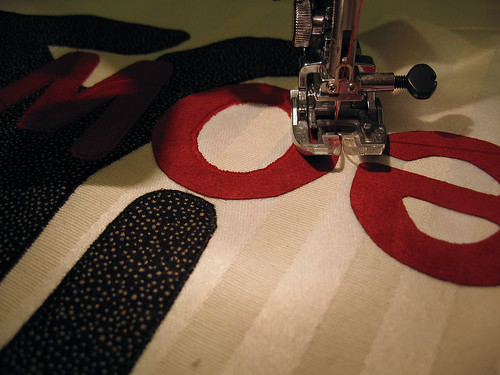
6) Using a small, narrow zigzag stitch, sew around entire applique to seal edges.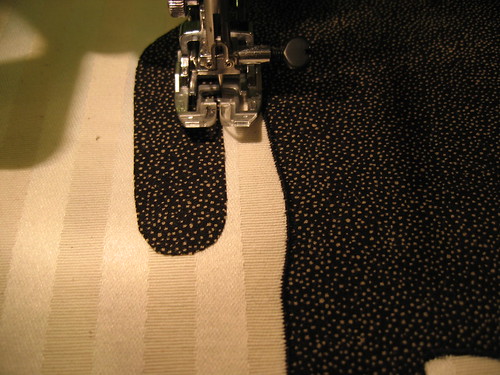
7) Repeat steps 4-6 for the letters.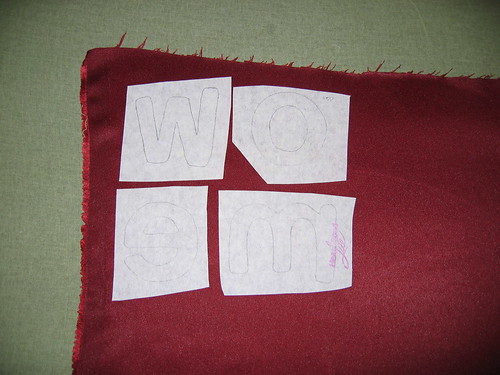
8) Finish the pillow as desired. I listed a few tutorials here. If you want a book, I recommended this oldie but goodie. I finished mine with piping, an overlap and buttons, but you could use a zipper or even sew the entire pillow closed.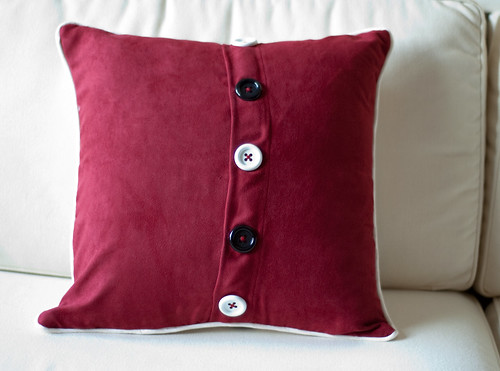
Applique Cat Pillow (No-Sew Version)
Fabric:
1/2 yard (or a piece at least 15 inches x 20 inches) for cat
1/4 yard (or a piece at least 4 inches by 12 inches) for letters
Supplies:
Finished 18 inch pillow with removable form (check that the fabric is able to be ironed at medium heat)
No-Sew Iron-on Adhesive (I like HeatnBond Ultra)
1) Remove form from pillow.
2) Follow steps 2-5 above to print out diagram, trace cat on to iron-on adhesive, attach iron-on adhesive to fabric, and then attach cat iron-on to pillow case. Repeat with letters.
2) Reinsert form. Done!
Thursday, September 23, 2010
The pillow says "meow" (tutorial)
Wednesday, September 8, 2010
Registry Schmedistry
While I haven't done a formal study of this topic, I'd be willing to bet that if you were to query my friends and family, they would unanimously label me as "the one who never buys our registries." Is that bad? Is there a special sort of hatred that is saved for gift-givers like me that ignore the registry? What if I promise to never ever buy something random that you will probably have to return but instead make you something (that will probably live in the closet until come to visit)?
So...? Am I still invited to the party? It's the thought that counts, right?
I don't have anything against registries, in theory. I think they are useful for people that want to give a gift but want to ensure the receiver loves it. Personally I find it a bit weird to tell people what to buy me, but the word on the street is that regstries=good. Yet when I'm putting together a gift, all the registry says to me is...BORING! Buying sheets for my dear friend's wedding shower? Uh, skeevy. Baby wipes? Not cute (Useful, yes. But not cute). And watching said registry gifts be unwrapped at a party? Hello, I already know what you were getting because I looked at your registry! (but thanks for inviting me, the cupcakes are fab...)
So this brings me back to the dilemma I faced for a friend's bridal shower. I know she needs a lot of the things on her registry as she and her fiance have just finished school. I had resigned myself to buying a few things off the registry but I really wanted to make her something that would make her say "aww, Kimmy made this for me" whenever she saw it. Narcissistic? Maybe. But that is neither here nor there...
Fortunately for me, there was a little note tucked in the shower invitation that highlighted some of my friend's favorite things and decor selections. A few popped out at me as inspiration--cats, black and red--and this is what came of it:
Cute, no? I liked it so much I made one for myself:

You want one too, you say? Hang tight, my dears, it's coming soon!
Monday, August 16, 2010
This is not a wedding blog
In case you haven't noticed, there has been very little discussion on this here bloggity blog about my upcoming wedding since the initial excitement. No, I'm not holding out on you (well, actually, I might be...more on that in a sec). There are actually to legitimate reasons why you haven't heard about any wedding planning:
1. I didn't want to overwhelm you with wedding planning craziness. Seriously, I think every girl that has gotten engaged since the dawn of the internet now has a wedding blog. This makes for interesting reading for those of us getting married, but I have a sneaking suspicion that it bores most everyone else to tears. I thought I'd spare you the color scheme/bridesmaid dresses/caterer discussions and just show you any awesome DIY projects that turn out cute. So I may be holding out on you, but just a little.
2. I have not done a single thing to plan our wedding
As for #2, I promise I'm working on that. Mr. McAwesome and I have figured out what we don't want, and have a list of musts. We'll start checking out venues any day now... :)
As for #1, don't worry. I will not be blabbing ad nauseum about my wedding on this blog. BUT if you are into that type of thing, I will be blabbing about my wedding ad nausum on another blog:

I've been asked to talk about planning my Nashville wedding on the local wedding guide of Elizabeth Anne Designs Weddings. Crazy, right? Anywho, I think it should be interesting to say the least. Plus there are a lot of other pretty things to look at over there if you should get tired of hearing me yap on and on
My first post is here. Wish me luck!
Saturday, August 14, 2010
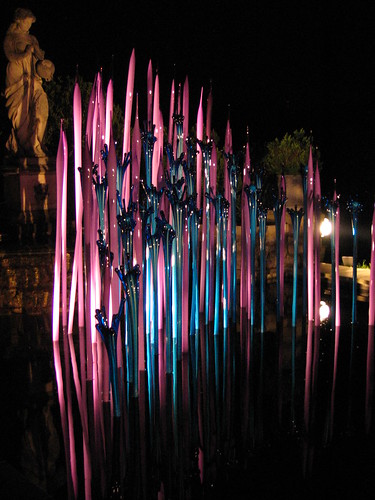
Chihuly at Cheekwood
A few weeks ago we went to see the installment of glass artisan Dale Chihuly at the Cheekwood Botanical Gardens. We went to the "Chihuly Nights" to take advantage of seeing the artwork with special lighting. Glass loves light, and the exhibits were amazing. I managed to snag a few nice pics despite the difficult lighting conditions, and I think they speak for themselves:

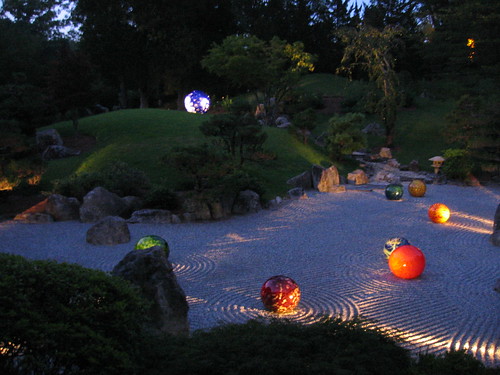
(My personal favorite)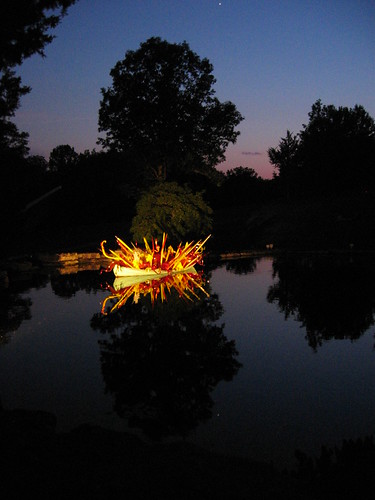


Did you see the little frog on that last one? He's ready for his close up! Love it!
In a word, awesome. Highly recommend you check it out if you are in Nashville or the exhibit comes to your town.
Wednesday, August 11, 2010
Read this! (aka the post where I start a book club...kinda)
So recently I was thinking I should join a book club. You know, to increase my motivation to read more books and have an excuse to sit around and drink wine with fellow readers. Unfortunately, I am not patient enough to deal with the hassle of 1) finding a book club or 2) participating in said club. Plus I have a strong aversion to reading books I don't want to read (high school English, anyone?). Thus I abandoned the book club idea...
Until I had a revelation:
Why not read a book I want to read, write about it on this here bloggity thing, and coerce/pretend that my umteen-million (give or take a few) devoted blog readers are reading and discussing along with me? BRILLIANT! (or pathetic. Take your pick ;))
Anyway, this will mostly be me processing random books I read, but it is my blog so why not? If you want to join me, right now I am reading this:
The Meaning of Wife by Anne Kingston (amazon link)
I'm about 1/3 in and it is very interesting. See you back here in a week or so for my "book-club" conversation about what I've learned :)
Tuesday, August 3, 2010
Pattern Review: Amy Butler Sophia Bag
Last year, when my mother was visiting, we were looking through my patterns in preparation for our annual fabric shopping extravaganza. She took one look at the Amy Butler Sophia pattern and said "That's my Christmas present from you!"
We went shopping and picked out fabric for her bag and for mine. I made mine first to try out the pattern. Her bag did not get finished for Christmas, so it became a Mother's Day gift...not really. I FINALLY gave her the bag this week as a "because you are wonderful and being here on vacation means I save on postage" present. She loved it all the same. And now that the bag is in her hands I can share my review of the Amy Butler Sophia pattern!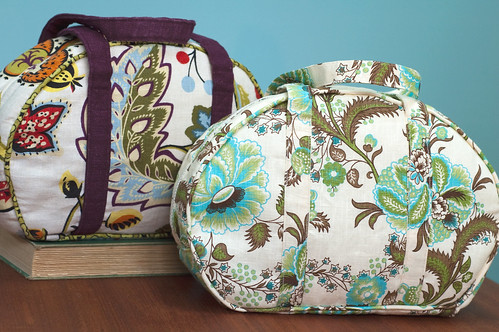
My bag is on the left; my mom's is on the right.
1) Like all Amy Butler patterns, this one is easy to follow. I had done piping before so I didn't have much problem with that. Frankly I didn't really follow the directions at all because I hardly ever do--there are only so many ways to assemble a purse! I really only looked at them for the zipper, which brings me to point number 2.
2) The pattern called for a "purse zipper"--two pulls that move outward from the center. My fabric store only had Coats purse zippers in black and an ugly brown. Um, no. For my bag (which I made first) I just got one long zipper: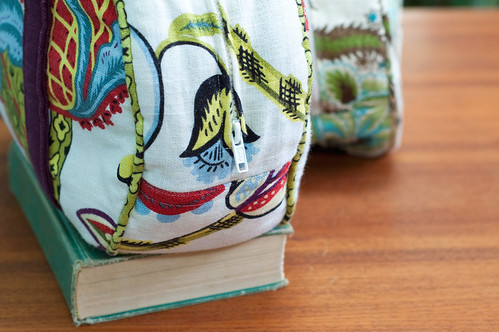
This worked fine, but is kind of a pain when you want to get into the bag. You have to open the WHOLE bag just to get in, and it's a long way around. Not too speedy.
For my mom's, I wanted to preserve the center opening so I got smarter. Instead of one 22 inch purse zipper, I got two 11 inch regular sport zippers.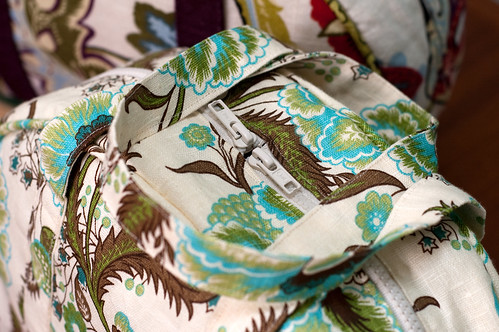
The only tricky part was keeping the zipper tape out of the way at the top. I ended up tucking them back and basting and then covering with the bag lining. This way the pulls would be close together like a purse zipper but I got the color I wanted! I also put on some pretty beads as zipper pulls after I took this picture, which really classed up the whole bag.
3) I had to do some fiddling with the lining to get it to work. For my bag I followed the instructions and sewed together the whole lining and stuffed it into the outer bag. While I was careful with my sewing, all the layers and piping of the outer bag made it a bit smaller than the lining (plus there was no accommidation for the turn of cloth. Thus my lining is too large. I went ahead and sewed it in around the zipper, but the false bottom covers a big wrinkle of extra fabric and my pockets go down onto the bottom of the bag. One day I will get around to fixing that.
For my mom's bag, I sewed the top zipper flaps to the sides of the lining. Then I put this in the outer bag and pinned in place. I marked where the bottom seam was and used this line to attach the bottom (which I also resized to match the bottom of the outer bag). No saggy lining on hers!
This also brings me to another point. I made her pockets like the pattern and they turned out cute: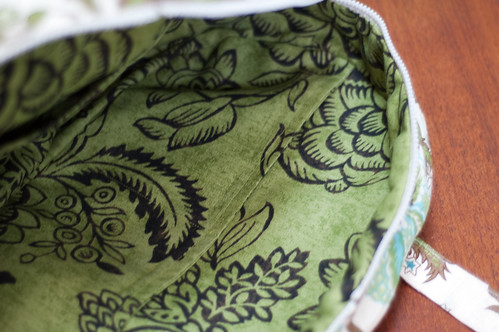
I added some of the extra piping to the top of my pockets, and I like the contrast. However, the weight of the piping makes my pockets a bit saggy. Just a warning if you go that direction.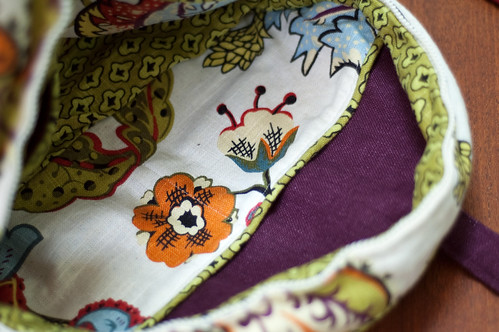
Judging my my mom's reaction, the Sophia bag is a success! I would definitely say that an ambitious beginner or intermediate sewer should have no problem with this pattern.
Wednesday, July 21, 2010
Sneak peek!
My handy man made me something!!
Three guesses what this is! :)
This has been on my "honey, pleeeeease?" list for a while, so I'm stoked that they are coming to be. We're still putting on the finishing touches, and I have lots of refolding to do, but I couldn't wait to share. I'll be back with more pics once the entire system is in place. Can't wait!
Thursday, July 8, 2010
Quicker that driving to Hallmark
This weekend I realized that today is the birthday of a dear friend (and the day before my birthday, hint hint!). I needed to get a card in the mail pronto, and I usually keep a stock of birthday cards on hand for just such emergencies. However, my supply was fresh out which left me with two options:
1) Get in the car, drive to Hallmark, look at eleventy-seven-million cards trying to find one that is cute but appropriate, look at a few more cards for giggles, pay way more than I think a stupid card is worth, drive home...
2) Make something.
Since this friend is the queen of scrapbooking and always makes adorable cards for every major (and a few minor) card-sending holiday, I felt like she deserved something special. I don't scrapbook, so there is no cute paper in my house, but I have plenty of cute fabric!
This is what I came up with:
Cute, right? Here's how you can make one.
Supplies:
Cardstock
Envelope (I save envelopes from unused invitations and such. Very handy)
Fabric scraps
Fabric cutting scissors/rotary cutter with mat
Paper cutting scissors (paper will dull your good fabric scissors, so I keep a separate pair for paper, etc.)
Thread
Used, but not abused, sewing needle (after I finish a sewing project, I put the needle in a case marked "used, for paper." They might be too dull for fabric, but still have some life left in them. Don't use a needle you used on paper for a fabric project--see above regarding paper scissors)
How-to:
Cut two pieces of cardstock to fit in your envelope. Mine ended up being 4.5"x6"
Select fabric scraps and trim into pleasing shapes, layering on a cutting mat if possible.
Note: I had to select from my "cool" stash of scraps as the "warm" stash was occupied.
Trim your fabric to about 1/2" larger than your cardstock (so mine was 5"x6.5"). This is easier with a cutting mat and rotary cutter, and is only really necessary to get some of the excess out of your way.
Center one piece of cardstock under your fabric and sew the layers together with zigzag, buttonhole, or other decorative stitches. Try to start from the center/bottom layers and work your way up and out.
Add embellishments, etc. I stamped "Happy Birthday" on another fabric scrap and attached it in the middle.
Trim fabric to the size of the cardstock. Place the other piece of cardstock on the back of the first one and attach with a narrow zigzag or buttonhole stitch around the edge. This will give you a nice clean surface to write your message.
Tada! Totally quicker than driving to buy a card, and so much cuter.
Monday, July 5, 2010
Better late than never

Happy fourth (er, fifth) of July!
I made these super yummy red, white, and blue cupcakes yesterday. Check out the recipe here. Mmmm, cream cheese frosting....
Friday, June 11, 2010
Afternoon with Alabama Chanin
On May 2, I was looking foward to spending an afternoon with Natalie Chanin, author of the Alabama Stich Book and Alabama Studio Style at my fave fabric shop. Unfortunately, other more pressing matters got in the way and the class was cancelled.
Fortunately, Natalie agreed to make another trip to Nashville and I got to go to my class afterall!
Natalie, who is positively delightful, gave us tips on her signature techniques. The time flew by as we sewed and listened to her stories.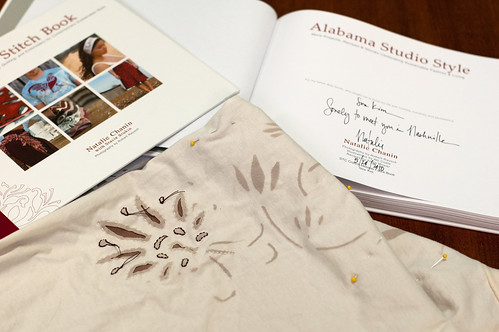
My tee is still a work in progress, but there is something so cathartic about sewing by hand. Me, on the porch, with iced tea, sewing? Yes, please! Stay tuned for the finished product...
Wednesday, June 9, 2010
Round and round she goes
True confessions time:
I am not what you would consider an "athlete." I try hard, but I'm miserable at team sports. I lettered in marching band! Plus I'm not the most coordinated (we all remember the scooter incident, right?). Also, gyms kinda skeeve me out and running on a treadmill makes me want to poke my eyes out with a spoon. BOOOORING!
Until recently, this hasn't really been a problem. Sure I've carried a few extra pounds around my middle, but it wasn't enough to make me increase my exercise beyond afternoon walks in the park, hiking on the weekend, and the occasional pilates session. Then I wrote my dissertation, defended, and got a job where I sit all day. Suddenly those few extra pounds were getting friendly with a few more, and then a few more after that. Not the kind of friends a girl wants!
So I upped my walking, going at lunch with some ladies in the office and attempting to jog after work. Still boring, but I stuck it out. The scale budged almost inperceptibly, and I wasn't falling over myself to get home and exercise in the evenings. I needed excitement! A challenge! Something that doesn't require running! Or a trainer yelling at me (no, you do those sit-ups!)!
Then the most random thing happened. The daily Groupon (an online coupon thingy), which is usually for bum-expanding delicious food discounts, was for a hula hoop class. Seriously. I had vaguely remembered reading a Southern Living article about an East Nashville hooper, and here were her classes--on sale!
This gal can't resist a sale.
I was a bit apprehensive when I joined 11 other grown women for the first class. But that soon melted away as I hooped, dropped my hoop, hooped some more, and laughed. A lot. Folks, you have not seen ridiculous until you have seen a room full of women hooping! But the funny thing was, I haven't had that much fun in a long time, expecially exercising! Hoop class became the highlight of my week.
You'll never guess what happened next: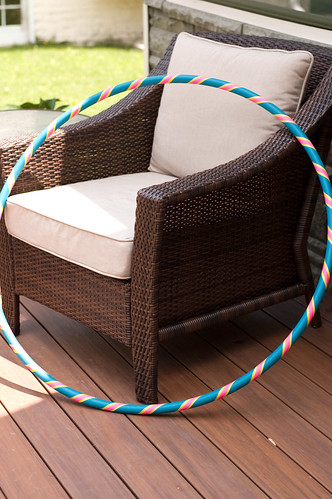
Yup, I'm the proud owner of my own, adult-sized (and pretty!) hoop. And yes, I do practice in my yard! (Well, out back. When the neighbors aren't home. And they aren't doing construction on the house across the alley. Baby steps, here). I'm officially addicted...I actually look forward to going home and hooping!
Unfortunately, all good things must come to an end. My final level 1 hoop class was last week. But have no fear--level 2 starts on monday! You haven't seen the end of my hooping yet!
Wednesday, May 26, 2010
Cute overload
Have you ever made something so cute that it causes you to squeal "ohmygoodnessthatissoooocuteeeee!!!!" (and then look around to see if anyone heard)?
Yeah, that's how I felt after I made these: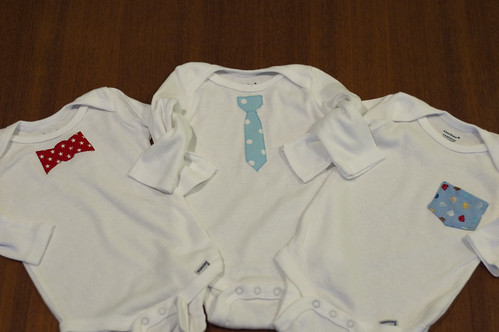
Ridiculous. It kills me.
And of course, you need pants to go with your fancy shirt/tie combo: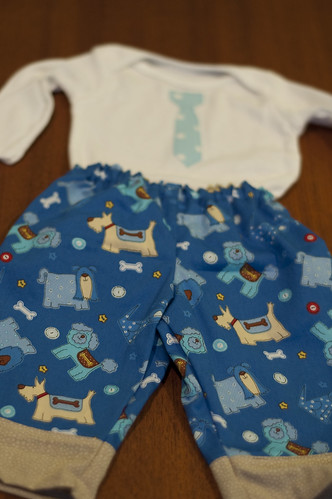
And shoes: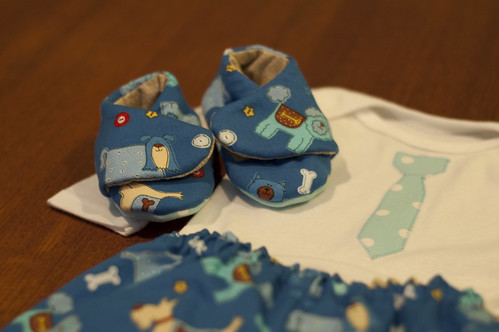
Baby showers rock--All of the cuteness, none of the poopey diapers!
(both pants and booties from Amy Butler's Little Stitches for Little Ones Oooh, bargain price right now! Snatch this up!)
Saturday, May 22, 2010
Vegas, baby!
Mr. McAwesome and I just got back from a little vacation in Vegas. (No, we didn't elope!) The first real vacation we took just with each other--is that crazy or what?
Speaking of crazy, Vegas is a crazy town. We managed to stay out of trouble, and just enjoyed seeing the sites:
We stayed at the New York-New York. Getting this shot took a lot of contortion and planning. Surprisingly, our antics were not the weirdest thing on the street that day and barely registered with passerby.

Saw a couple of shows. Cirque du Soleil Beatles LOVE and Terry Fator. Both were awesome.
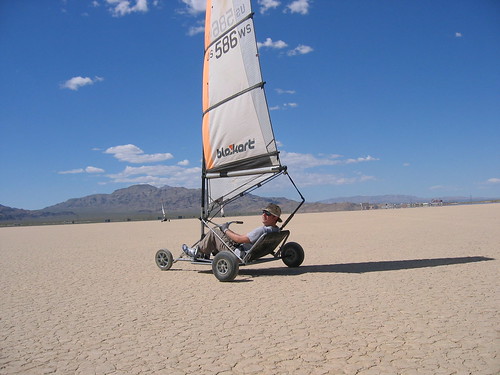
Land sailing in a dry lake. SOOOO cool! Highly recommended.
Finally, we just toured the strip: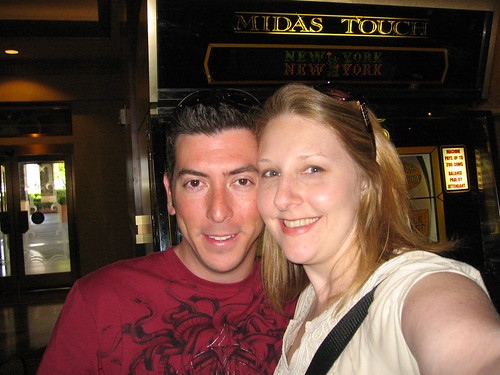
Giant slot machine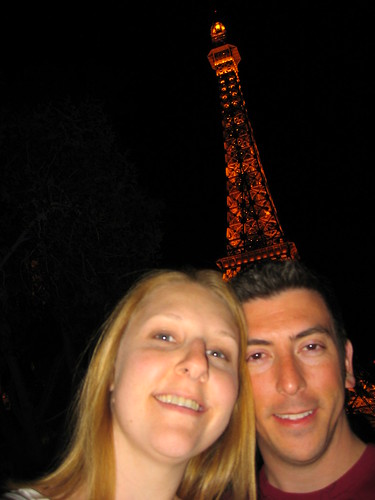
Paris
Mirage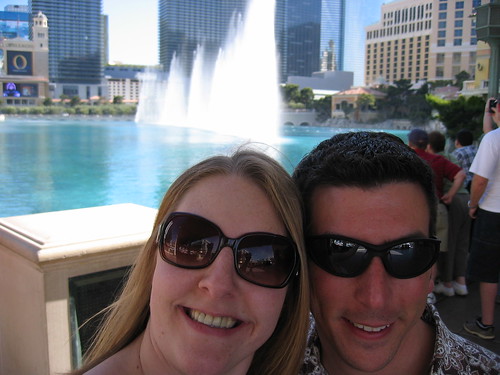
Bellagio
Fun times, but good to be back to reality!
Subscribe to:
Posts (Atom)


