My handy man made me something!!
Three guesses what this is! :)
This has been on my "honey, pleeeeease?" list for a while, so I'm stoked that they are coming to be. We're still putting on the finishing touches, and I have lots of refolding to do, but I couldn't wait to share. I'll be back with more pics once the entire system is in place. Can't wait!
Wednesday, July 21, 2010
Sneak peek!
Thursday, July 8, 2010
Quicker that driving to Hallmark
This weekend I realized that today is the birthday of a dear friend (and the day before my birthday, hint hint!). I needed to get a card in the mail pronto, and I usually keep a stock of birthday cards on hand for just such emergencies. However, my supply was fresh out which left me with two options:
1) Get in the car, drive to Hallmark, look at eleventy-seven-million cards trying to find one that is cute but appropriate, look at a few more cards for giggles, pay way more than I think a stupid card is worth, drive home...
2) Make something.
Since this friend is the queen of scrapbooking and always makes adorable cards for every major (and a few minor) card-sending holiday, I felt like she deserved something special. I don't scrapbook, so there is no cute paper in my house, but I have plenty of cute fabric!
This is what I came up with:
Cute, right? Here's how you can make one.
Supplies:
Cardstock
Envelope (I save envelopes from unused invitations and such. Very handy)
Fabric scraps
Fabric cutting scissors/rotary cutter with mat
Paper cutting scissors (paper will dull your good fabric scissors, so I keep a separate pair for paper, etc.)
Thread
Used, but not abused, sewing needle (after I finish a sewing project, I put the needle in a case marked "used, for paper." They might be too dull for fabric, but still have some life left in them. Don't use a needle you used on paper for a fabric project--see above regarding paper scissors)
How-to:
Cut two pieces of cardstock to fit in your envelope. Mine ended up being 4.5"x6"
Select fabric scraps and trim into pleasing shapes, layering on a cutting mat if possible.
Note: I had to select from my "cool" stash of scraps as the "warm" stash was occupied.
Trim your fabric to about 1/2" larger than your cardstock (so mine was 5"x6.5"). This is easier with a cutting mat and rotary cutter, and is only really necessary to get some of the excess out of your way.
Center one piece of cardstock under your fabric and sew the layers together with zigzag, buttonhole, or other decorative stitches. Try to start from the center/bottom layers and work your way up and out.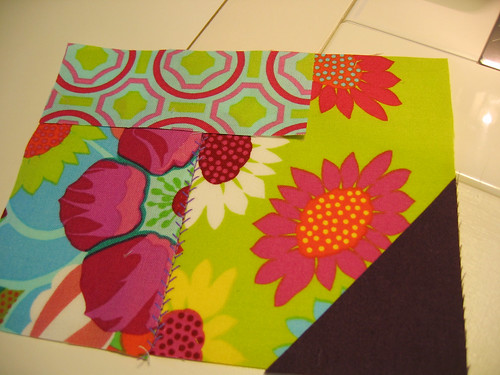
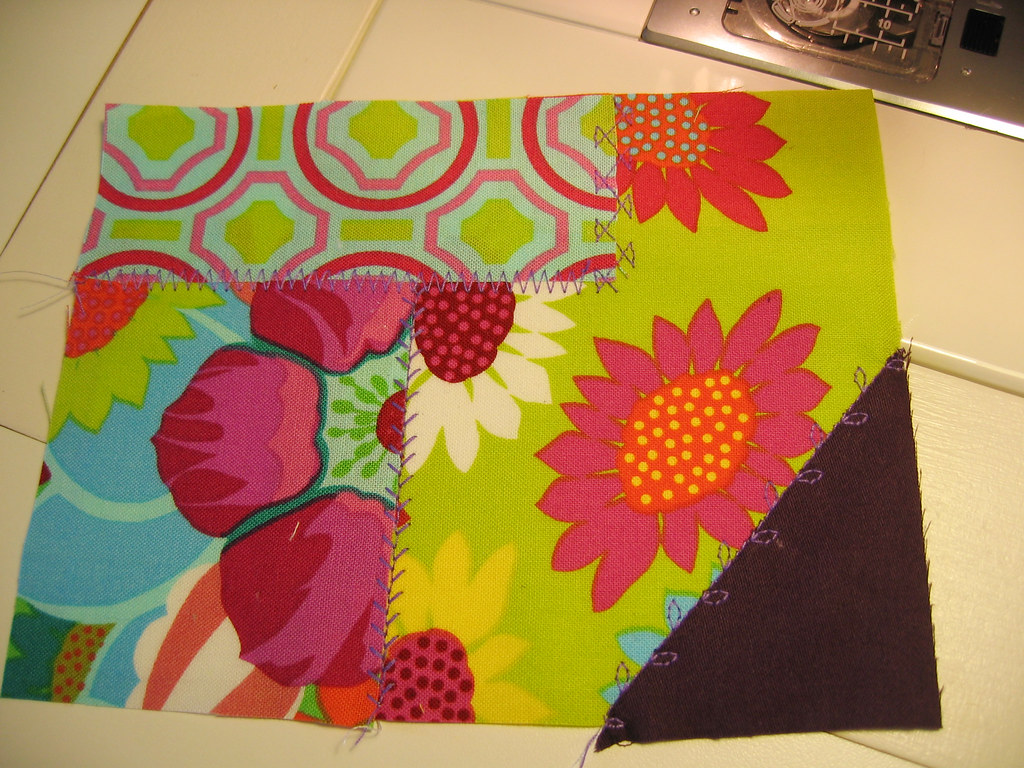
Add embellishments, etc. I stamped "Happy Birthday" on another fabric scrap and attached it in the middle.
Trim fabric to the size of the cardstock. Place the other piece of cardstock on the back of the first one and attach with a narrow zigzag or buttonhole stitch around the edge. This will give you a nice clean surface to write your message.
Tada! Totally quicker than driving to buy a card, and so much cuter.
Monday, July 5, 2010
Better late than never

Happy fourth (er, fifth) of July!
I made these super yummy red, white, and blue cupcakes yesterday. Check out the recipe here. Mmmm, cream cheese frosting....
Subscribe to:
Posts (Atom)