Monday, August 16, 2010

This is not a wedding blog

In case you haven't noticed, there has been very little discussion on this here bloggity blog about my upcoming wedding since the initial excitement. No, I'm not holding out on you (well, actually, I might be...more on that in a sec). There are actually to legitimate reasons why you haven't heard about any wedding planning:

1. I didn't want to overwhelm you with wedding planning craziness. Seriously, I think every girl that has gotten engaged since the dawn of the internet now has a wedding blog. This makes for interesting reading for those of us getting married, but I have a sneaking suspicion that it bores most everyone else to tears. I thought I'd spare you the color scheme/bridesmaid dresses/caterer discussions and just show you any awesome DIY projects that turn out cute. So I may be holding out on you, but just a little.

2. I have not done a single thing to plan our wedding

As for #2, I promise I'm working on that. Mr. McAwesome and I have figured out what we don't want, and have a list of musts. We'll start checking out venues any day now... :)

As for #1, don't worry. I will not be blabbing ad nauseum about my wedding on this blog. BUT if you are into that type of thing, I will be blabbing about my wedding ad nausum on another blog:


I've been asked to talk about planning my Nashville wedding on the local wedding guide of Elizabeth Anne Designs Weddings. Crazy, right? Anywho, I think it should be interesting to say the least. Plus there are a lot of other pretty things to look at over there if you should get tired of hearing me yap on and on
My first post is here. Wish me luck!

Saturday, August 14, 2010

Chihuly at Cheekwood

A few weeks ago we went to see the installment of glass artisan Dale Chihuly at the Cheekwood Botanical Gardens. We went to the "Chihuly Nights" to take advantage of seeing the artwork with special lighting. Glass loves light, and the exhibits were amazing. I managed to snag a few nice pics despite the difficult lighting conditions, and I think they speak for themselves:

Chihuly 1
Chihuly 2
Chihuly 3
(My personal favorite)
Chihluy 4
Chihuly 5
Chihluy 6
Chihuly 7
Chihuly 8
Chihuly 9
Chihuly 10
Chihuly 11
Chihuly 12
Did you see the little frog on that last one? He's ready for his close up! Love it!

In a word, awesome. Highly recommend you check it out if you are in Nashville or the exhibit comes to your town.

Wednesday, August 11, 2010

Read this! (aka the post where I start a book club...kinda)

So recently I was thinking I should join a book club. You know, to increase my motivation to read more books and have an excuse to sit around and drink wine with fellow readers. Unfortunately, I am not patient enough to deal with the hassle of 1) finding a book club or 2) participating in said club. Plus I have a strong aversion to reading books I don't want to read (high school English, anyone?). Thus I abandoned the book club idea...

Until I had a revelation:

Why not read a book I want to read, write about it on this here bloggity thing, and coerce/pretend that my umteen-million (give or take a few) devoted blog readers are reading and discussing along with me? BRILLIANT! (or pathetic. Take your pick ;))

Anyway, this will mostly be me processing random books I read, but it is my blog so why not? If you want to join me, right now I am reading this:

The Meaning of Wife by Anne Kingston (amazon link)

I'm about 1/3 in and it is very interesting. See you back here in a week or so for my "book-club" conversation about what I've learned :)

Tuesday, August 3, 2010

Pattern Review: Amy Butler Sophia Bag

Last year, when my mother was visiting, we were looking through my patterns in preparation for our annual fabric shopping extravaganza. She took one look at the Amy Butler Sophia pattern and said "That's my Christmas present from you!"


We went shopping and picked out fabric for her bag and for mine. I made mine first to try out the pattern. Her bag did not get finished for Christmas, so it became a Mother's Day gift...not really. I FINALLY gave her the bag this week as a "because you are wonderful and being here on vacation means I save on postage" present. She loved it all the same. And now that the bag is in her hands I can share my review of the Amy Butler Sophia pattern!


sophia bag 2

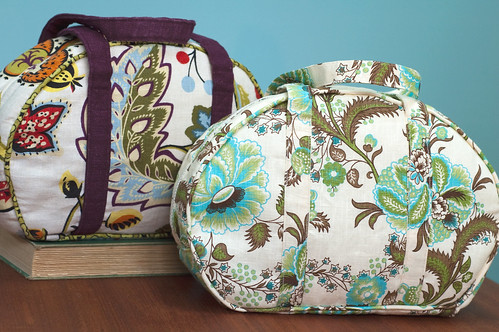
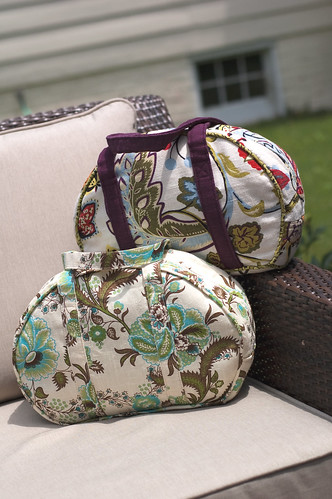
My bag is on the left; my mom's is on the right.

1) Like all Amy Butler patterns, this one is easy to follow. I had done piping before so I didn't have much problem with that. Frankly I didn't really follow the directions at all because I hardly ever do--there are only so many ways to assemble a purse! I really only looked at them for the zipper, which brings me to point number 2.

2) The pattern called for a "purse zipper"--two pulls that move outward from the center. My fabric store only had Coats purse zippers in black and an ugly brown. Um, no. For my bag (which I made first) I just got one long zipper:

sopha bag zipper 2

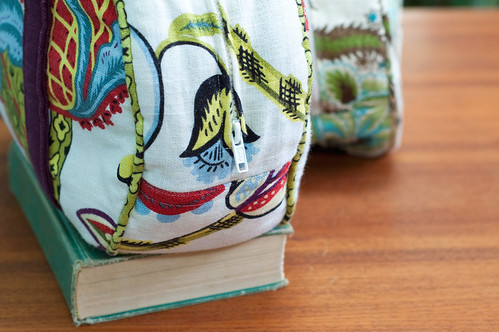
This worked fine, but is kind of a pain when you want to get into the bag. You have to open the WHOLE bag just to get in, and it's a long way around. Not too speedy.

For my mom's, I wanted to preserve the center opening so I got smarter. Instead of one 22 inch purse zipper, I got two 11 inch regular sport zippers.

sophia bag zipper 1

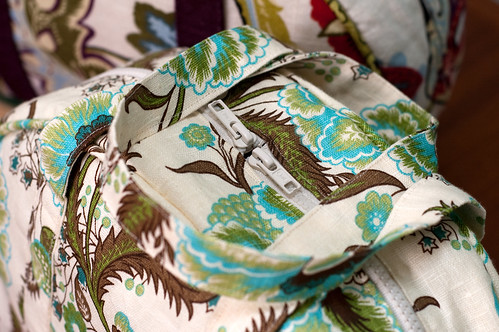
The only tricky part was keeping the zipper tape out of the way at the top. I ended up tucking them back and basting and then covering with the bag lining. This way the pulls would be close together like a purse zipper but I got the color I wanted! I also put on some pretty beads as zipper pulls after I took this picture, which really classed up the whole bag.

3) I had to do some fiddling with the lining to get it to work. For my bag I followed the instructions and sewed together the whole lining and stuffed it into the outer bag. While I was careful with my sewing, all the layers and piping of the outer bag made it a bit smaller than the lining (plus there was no accommidation for the turn of cloth. Thus my lining is too large. I went ahead and sewed it in around the zipper, but the false bottom covers a big wrinkle of extra fabric and my pockets go down onto the bottom of the bag. One day I will get around to fixing that.

For my mom's bag, I sewed the top zipper flaps to the sides of the lining. Then I put this in the outer bag and pinned in place. I marked where the bottom seam was and used this line to attach the bottom (which I also resized to match the bottom of the outer bag). No saggy lining on hers!

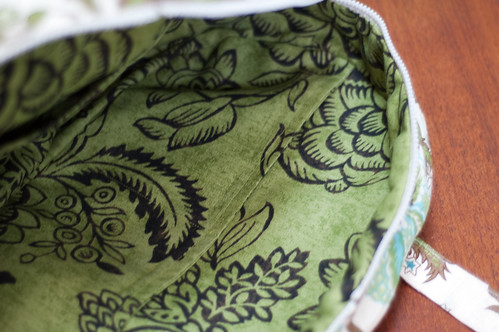
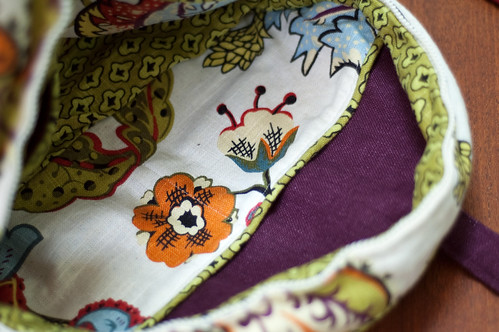
This also brings me to another point. I made her pockets like the pattern and they turned out cute:


sophia bag lining 1

I added some of the extra piping to the top of my pockets, and I like the contrast. However, the weight of the piping makes my pockets a bit saggy. Just a warning if you go that direction.
sophia bag lining 2

Judging my my mom's reaction, the Sophia bag is a success! I would definitely say that an ambitious beginner or intermediate sewer should have no problem with this pattern.

sophia bag 1