So way back when I was preparing for the previously mentioned Steeplechase I decided that I couldn't possibly wear an OLD dress to the sundress event of the season and thus decided I'd make one. Sure it's crazy to take on yet another project when I'm already super busy, but I'm also cheap (thrifty?) and didn't want to go spend >$100 for a dress I'd be wearing in a field (and while using a port-o-potty!)
I chose one of Amy Butler's patterns that I won in the contest as I knew it would be well written and likely to go together quickly. And I just thought the Lotus Tunic was cute!

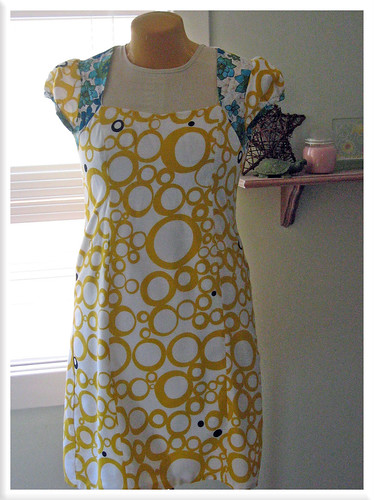
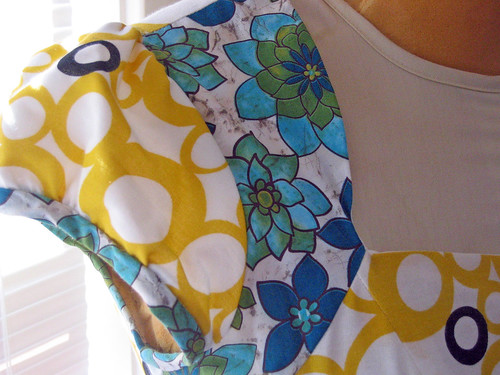
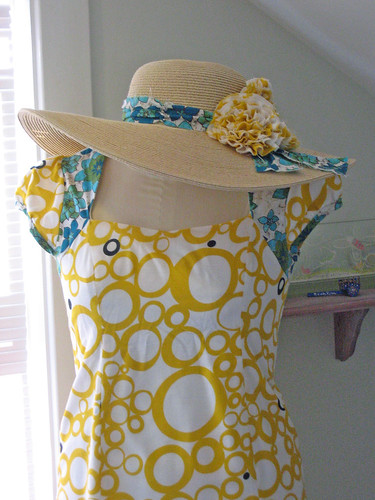
I chose some REALLY cheap stash fabric as I wanted to make a wearable muslin (practice garment) first before cutting into some lovely AB fabric. I ran out of time and ended up wearing this dress. The main fabric is an IKEA quilt cover I got for $5.00 from their as-is bin. The contrast is a remnant from Jo-Ann's that I liked. I lined with plain white fabric I had on hand...may have previously been a bedsheet (shhhh!)
So, what did I think of this pattern?
Options:
The Lotus Tunic also includes a cami and dress length option. Based on the "back of neck to hem" measurements on the envelope, the cami falls at hip length, the tunic a few inches above the knee, and the dress to mid calf--on me. I am 5'9", so I think the tunic would make a nice knee length dress for most women. I went with this length as I didn't want to risk an unattractive mid-calf length, but it ended up a mini-dress that was close to pushing my modestly limits. Next time I'll lengthen a few inches...
Sizing:
The sizing seemed pretty standard to me, but if you usually fall below or above department store s-m-l you might have to do some major alterations. My measurements fit into a medium perfectly for bust and hip, but my waist measurement was closer to a large. I ended up tracing the pattern on to other paper and drafting a merged size that was a medium everywhere but the waist. I didn't want the hourglass shape of the tunic to be all clingy and have a replay of the fiasco at the boy's best friend's wedding last year:
- Crazy photographer: Aww, is there a reason he's rubbing your stomach?
- Me*: No, you jerk! I'm just fat and bloated on cake and neglected to wear my scary stomach-holding in granny panties. Take that ridiculous faux pimp hat you stole from the weird DJ and take someone else's picture...
- * May not have actually been said outside of my head
Pattern:
The pattern pieces were nicely labeled, but printed on tissue like a commercial pattern rather than paper like most indie designers. I'm guessing this is because it is an apparel pattern, but I trace all my patterns on to other paper so I can make adjustments and still have the original to fall back on. Much easier with paper rather than tissue, but my only complaint.
Instructions:
The instructions were very easy to follow, in my opinion, especially if you have made a few garments before. It could easily be someone's first garment pattern, but they might want to allow extra time and make sure to read through EVERYTHING before starting. The mistakes I made were due to a lack of pre-reading, overconfidence in my abilities, and breaking my "no sewing after midnight" rule. I did have a few problem spots:
1. The first step is to put on belt loops and make a belt. What? I didn't even see a belt on the envelope...Totally just left that out as I'm not a belt person anyway. May have been good to label this "optional".
2. I put in an invisible zipper, which was easy even without an invisible zipper foot. Mine did turn out kinda puckery and not as neat as I would have liked, but I think that was a combo of thin fabric and no invisible zipper foot.
3. At one point it says to turn dress inside of lining. The next step talks about sewing the armhole together and specifies that it should be wrong sides together. The turning step didn't say that, so of course I put it right sides together and started sewing. I was almost done before I realized it would be impossible to put my arm through the armhole I had just sewn...
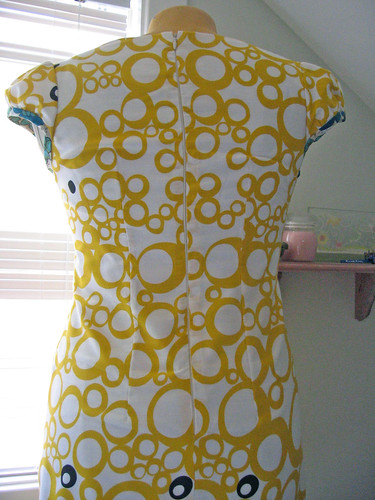
4. The binding on the cap sleeves is stitch-in-the-ditch like you would bind a quilt. Easy in theory, tricky in practice. I'm not a quilter, so one arm looks good, the other not so much. I'll only show you the good arm! :)
4. The binding on the cap sleeves is stitch-in-the-ditch like you would bind a quilt. Easy in theory, tricky in practice. I'm not a quilter, so one arm looks good, the other not so much. I'll only show you the good arm! :)
All in all, it is cute styling and I'll make more. I'll make the tunic longer for a real dress, or shorter for a real tunic. And fine tune the sizing, as that's the best part about making your own clothes!
I'd say that advanced beginners or intermediate sewers would be fine with this pattern. Do as I say, not as I do and read through before beginning and you'll be golden.
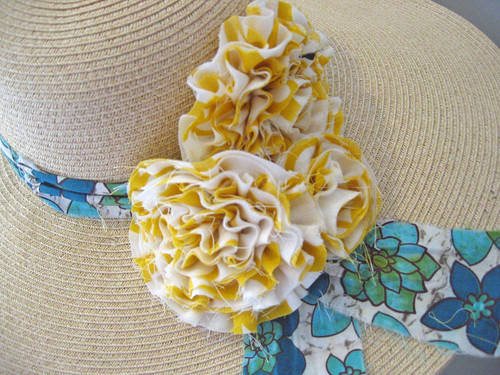
Oh, and of course I had to dress up my hat for Steeplechase. It's not a horse race without a hat! I made fabric flowers from the Anna Tunic (also by Amy Butler) and pinned them to the hat.
I'd say that advanced beginners or intermediate sewers would be fine with this pattern. Do as I say, not as I do and read through before beginning and you'll be golden.
Oh, and of course I had to dress up my hat for Steeplechase. It's not a horse race without a hat! I made fabric flowers from the Anna Tunic (also by Amy Butler) and pinned them to the hat.
So cute!


I think it turned out great! And I love the contrast!
ReplyDeleteOMG all I have to say is wow I would have liked to see how it looks on a real person though.. I have this pattern and its on my list of things to do... although now that summers here it may not get done..
ReplyDeleteThis is amazing. really love it. I have this pattern and its on my list of things to do do.. but now that summers here it may need to wait..
ReplyDeleteVery cute! I've been lusting after that pattern, so I was pleased to stumble across your review.
ReplyDeleteGreat review - love the hat
ReplyDelete