Last year, when my mother was visiting, we were looking through my patterns in preparation for our annual fabric shopping extravaganza. She took one look at the Amy Butler Sophia pattern and said "That's my Christmas present from you!"
We went shopping and picked out fabric for her bag and for mine. I made mine first to try out the pattern. Her bag did not get finished for Christmas, so it became a Mother's Day gift...not really. I FINALLY gave her the bag this week as a "because you are wonderful and being here on vacation means I save on postage" present. She loved it all the same. And now that the bag is in her hands I can share my review of the Amy Butler Sophia pattern!
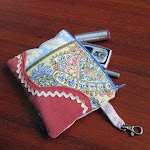
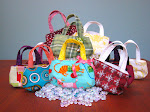
My bag is on the left; my mom's is on the right.
1) Like all Amy Butler patterns, this one is easy to follow. I had done piping before so I didn't have much problem with that. Frankly I didn't really follow the directions at all because I hardly ever do--there are only so many ways to assemble a purse! I really only looked at them for the zipper, which brings me to point number 2.
2) The pattern called for a "purse zipper"--two pulls that move outward from the center. My fabric store only had Coats purse zippers in black and an ugly brown. Um, no. For my bag (which I made first) I just got one long zipper:
This worked fine, but is kind of a pain when you want to get into the bag. You have to open the WHOLE bag just to get in, and it's a long way around. Not too speedy.
For my mom's, I wanted to preserve the center opening so I got smarter. Instead of one 22 inch purse zipper, I got two 11 inch regular sport zippers.
The only tricky part was keeping the zipper tape out of the way at the top. I ended up tucking them back and basting and then covering with the bag lining. This way the pulls would be close together like a purse zipper but I got the color I wanted! I also put on some pretty beads as zipper pulls after I took this picture, which really classed up the whole bag.
3) I had to do some fiddling with the lining to get it to work. For my bag I followed the instructions and sewed together the whole lining and stuffed it into the outer bag. While I was careful with my sewing, all the layers and piping of the outer bag made it a bit smaller than the lining (plus there was no accommidation for the turn of cloth. Thus my lining is too large. I went ahead and sewed it in around the zipper, but the false bottom covers a big wrinkle of extra fabric and my pockets go down onto the bottom of the bag. One day I will get around to fixing that.
For my mom's bag, I sewed the top zipper flaps to the sides of the lining. Then I put this in the outer bag and pinned in place. I marked where the bottom seam was and used this line to attach the bottom (which I also resized to match the bottom of the outer bag). No saggy lining on hers!
This also brings me to another point. I made her pockets like the pattern and they turned out cute:
I added some of the extra piping to the top of my pockets, and I like the contrast. However, the weight of the piping makes my pockets a bit saggy. Just a warning if you go that direction.
Judging my my mom's reaction, the Sophia bag is a success! I would definitely say that an ambitious beginner or intermediate sewer should have no problem with this pattern.
Tuesday, August 3, 2010
Pattern Review: Amy Butler Sophia Bag


Wednesday, July 21, 2010
Sneak peek!
My handy man made me something!!
Three guesses what this is! :)
This has been on my "honey, pleeeeease?" list for a while, so I'm stoked that they are coming to be. We're still putting on the finishing touches, and I have lots of refolding to do, but I couldn't wait to share. I'll be back with more pics once the entire system is in place. Can't wait!

Thursday, July 8, 2010
Quicker that driving to Hallmark
This weekend I realized that today is the birthday of a dear friend (and the day before my birthday, hint hint!). I needed to get a card in the mail pronto, and I usually keep a stock of birthday cards on hand for just such emergencies. However, my supply was fresh out which left me with two options:
1) Get in the car, drive to Hallmark, look at eleventy-seven-million cards trying to find one that is cute but appropriate, look at a few more cards for giggles, pay way more than I think a stupid card is worth, drive home...
2) Make something.
Since this friend is the queen of scrapbooking and always makes adorable cards for every major (and a few minor) card-sending holiday, I felt like she deserved something special. I don't scrapbook, so there is no cute paper in my house, but I have plenty of cute fabric!
This is what I came up with:
Cute, right? Here's how you can make one.
Supplies:
Cardstock
Envelope (I save envelopes from unused invitations and such. Very handy)
Fabric scraps
Fabric cutting scissors/rotary cutter with mat
Paper cutting scissors (paper will dull your good fabric scissors, so I keep a separate pair for paper, etc.)
Thread
Used, but not abused, sewing needle (after I finish a sewing project, I put the needle in a case marked "used, for paper." They might be too dull for fabric, but still have some life left in them. Don't use a needle you used on paper for a fabric project--see above regarding paper scissors)
How-to:
Cut two pieces of cardstock to fit in your envelope. Mine ended up being 4.5"x6"
Select fabric scraps and trim into pleasing shapes, layering on a cutting mat if possible.
Note: I had to select from my "cool" stash of scraps as the "warm" stash was occupied.
Trim your fabric to about 1/2" larger than your cardstock (so mine was 5"x6.5"). This is easier with a cutting mat and rotary cutter, and is only really necessary to get some of the excess out of your way.
Center one piece of cardstock under your fabric and sew the layers together with zigzag, buttonhole, or other decorative stitches. Try to start from the center/bottom layers and work your way up and out.
Add embellishments, etc. I stamped "Happy Birthday" on another fabric scrap and attached it in the middle.
Trim fabric to the size of the cardstock. Place the other piece of cardstock on the back of the first one and attach with a narrow zigzag or buttonhole stitch around the edge. This will give you a nice clean surface to write your message.
Tada! Totally quicker than driving to buy a card, and so much cuter.


Monday, July 5, 2010
Better late than never
Happy fourth (er, fifth) of July!
I made these super yummy red, white, and blue cupcakes yesterday. Check out the recipe here. Mmmm, cream cheese frosting....

Subscribe to:
Posts (Atom)


 Posts
Posts