Happy fourth (er, fifth) of July!
I made these super yummy red, white, and blue cupcakes yesterday. Check out the recipe here. Mmmm, cream cheese frosting....
Showing posts with label baking. Show all posts
Showing posts with label baking. Show all posts
Monday, July 5, 2010
Better late than never


Monday, June 15, 2009
Cofee cupcake craziness
Sometimes a gal just needs a cup of joe. And a doughnut (with sprinkles, please). Aw heck, just throw it all in a cupcake:
I know, I know - the insanity! But so worth it.
Want to make them? I know you do. Recipe adapted from here (which was adapted from here).
Coffee and doughnut cupcakes - makes 12
Ingredients:
for cupcakes:
1 stick butter, softened
1 cup sugar
2 large eggs
1/2 teaspoon vanilla
1 1/2 cups all-purpose flour
3/4 teaspoons baking powder
pinch of salt
1/2 cup strong brewed coffee (cooled)
1/8 cup half & half
for coffee frosting:
1/2 cup butter, room temp
1 1/2 cup confectioners' sugar
2 tablespoons coffee (plus more as needed)
1 tablespoon half and half (as needed)
1/2 teaspoon vanilla
decoration:
sprinkles and doughnut holes (Krispy Kreme? yes please!!)
Preheat oven to 350 degrees F. Prepare cupcake pan with liners.
Whisk together four, baking powder, and salt in bowl. Set aside
Combine coffee and milk, set aside.
Cream butter and sugar until light and fluffy. Add eggs, one at a time, and vanilla.
Alternate adding flour and coffee mixture to butter mixture, beating until combined.
Pour batter into prepared pans. Bake 15-20 minutes or until golden brown. Let cool on wire rack.
For coffee frosting -
Cream butter in bowl of electric mixer. Carefully add about half of sugar, and 2 tablespoons coffee. Add rest of sugar slowly, testing for sweetness and consistency (I found it a bit sweet with all the sugar). Add more coffee and half and half to thin/amp up the coffee flavor!
Decorate!!
Oh, boo-ya! Get on in there for a closer look:
THAT is what I'm talking about.
Mmm, coffee and doughnuts...mug optional!


Sunday, February 22, 2009

Tuesday, July 8, 2008
Eat your wheaties
My dear dear boy is a hoarder. Not the scary every-newspaper-since-1976 kind but more like a boy scout--always prepared. That is why our new storage room he built (remind me to show you how awesome a job he did!) has many many 5 gallon buckets of food staples. Like beans, chickpeas, and this:

Yup. A huge a$$ bucket of whole wheat. Not whole wheat flour. Actual whole wheat. And what do you do with whole wheat, you ask?
Step one: Purchase grain mill (reviews here). Attach to sturdy work bench and get your arm muscles ready.
Step two: Add wheat. Now you know what whole wheat really looks like!

Step one: Purchase grain mill (reviews here). Attach to sturdy work bench and get your arm muscles ready.

Step two: Add wheat. Now you know what whole wheat really looks like!

Step three: Skip the gym and get your workout by giving the mill a good ol' crank. Catch the flour in a bowl.


Step four (optional): Sift out the bigger bran pieces for a finer whole wheat flour. We saved the bran to add back into bran muffins or mix with granola for yogurt or for beefing up instant oatmeal.

Bran left, flour right

Bran left, flour right
Step five: Make something yummy with your fresh whole wheat flour. We cut ours 50/50 with store bought all-purpose flour for bread and pizza dough (didn't want the dough to be too heavy). Both were awesome and eaten before I had a chance to take a picture! I promise to stop back with the recipe when the boy tells me which one he used...
Tip that I learned from the boy (he's such a foodie): Whole wheat flour lasts longer if you keep it in an air tight container in the fridge. We actually use the vacuum sealer so it does not get damp. I had no idea flour actually went bad... Go figure!
Tip that I learned from the boy (he's such a foodie): Whole wheat flour lasts longer if you keep it in an air tight container in the fridge. We actually use the vacuum sealer so it does not get damp. I had no idea flour actually went bad... Go figure!
Friday, June 20, 2008
In a jam
A few weekends ago we realized that it was the middle of strawberry season AND there was a pick your own strawberry field just outside of town. Fresh strawberries? Um, yes please!
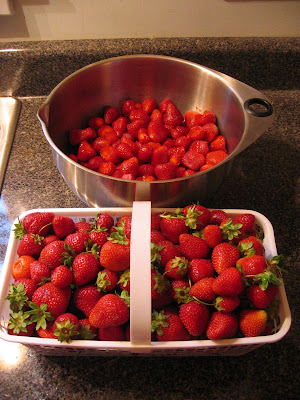
We fell in love with the cute little farm and went a little overboard with the picking...2 gallons overboard! It was only $20 and a bit of our time, and it was nice to get out in the field and out of the city for a bit.
Nonetheless, we had a LOT of berries. That means it's JAM TIME!
Now here's the rub. Neither the boy nor myself have ever made jam. So it was bound to get interesting.
First we discovered that pectin, the stuff you need to make jam all jam-like and not soupy, requires a ton of sugar. The stuff we had was about 7 cups/batch. Ick. I can't stand overly sweet strawberry jam....I like it to have a little bite to it! Fortunately we ran across this article from the UT agriculture school and discovered low-sugar pectin. And being the scientist that I am, we decided to do an unofficial test of two brands: Ball and Sure Jell.
And then the fun began.
First, the decapitation
.
One gallon down, one to go!

One gallon down, one to go!
And sterilization of the jars:

We followed the directions on the pectin boxes, which of course meant that the Ball batch was different than the Sure Jell batch. For instance, the Ball pectin required apple juice to set while Sure Jell did not. But the Sure Jell did require a certain amount of sugar (4 cups I think) while the Ball let you use a range of sugar, or sweetener, or even honey! We kept it simple and went for sugar.

The berries were beaten to a pulp and the cooking of the strawberry goo was fast and furious. Of course, the boy had to show reclaim his manliness by drinking a Guinness while stirring jam in my apron!


Not the cleanest project in the world, but fun! We bought this kit when buying jars, and it was TOTALLY worth it. Jar lifter, lid lifter magnetic stick thing, and funnel. Yeah, you need those!

Ten minutes in a boiling water bath, 24 hrs on the counter and.....


Whew! Lotsa jam. Now we are going to have to eat a whole lot of toast....
Wednesday, June 11, 2008
These cupcakes are evil
Horrid cupcakes.
Absolutely revolting.
Who in their right mind would put this into cupcake batter?

Mmmm, peanut butter cups
And make frosting out of this?

Ooooh, dark chocolate
And create something as disgusting as this?

Whoa! Double chocolate peanut butter fudge cupcakes?!?!
Who would eat this mess?

MMMMMM, that'd be me!

Original recipe here. My changes included making 24 cupcakes and baking for only 15 min. I used one 10.5 oz bag of "snack size" peanut butter cups in the batter (the original size to me) and about half of a bag of mini's for the topping. Yummmmmm.
Monday, May 12, 2008
Steeplechase Red Velvet Cake Balls
This past Saturday was the annual Iroquois Steeplechase here in N-ville. Somewhat of our answer to the Derby, it's a day for wearing cute dresses and hats (more on that later), tailgating with friends, and watching some magnificent animals.
This year, I was "volunteered" to bring desserts to our tailgate party. I already knew that I wouldn't be allowed to show up without the cookies, but I was at a loss at what else to bring. I'm a glutton for punishment, so it had to be something fun, yummy, impressive, and able to stand being made the night before then punished by sitting out all day. And that's when I discovered cake balls...
The original recipe is here. Super cute and super easy, I've documented my experience (plus my extra special customization, of course) for you all.
Step 1: Bake a box of red velvet cake mix in a 9x13 pan and let cool.

Step 2: Crumble your beautiful cake into a big bowl.

Step 3: Mix one can of cream cheese FROSTING into your crumbled cake. Don't use whipped frosting, just the regular stuff. This can get messy. Halfway through I was wishing I had a 6 year old in a smock--they'd get a kick out of this project!

Step 4: Roll your cake/frosting mixture into balls. Mine started out quarter sized then grew as I got bored with rolling. And having red hands. Again, the small child would have come in handy here. Chill your balls (!) in the fridge for a few hours.

Step 5: Melt a few bricks of bark coating in the microwave--follow the package directions. Roll each ball in the bark coating then drop on to wax paper. If you feel inclined, decorate with sprinkles now before the coating sets. I used green sugar; the reason for this will become apparent in the next step!
TIP-The red velvet cake does eventually pollute your nice white bark coating. I used small batches and got a new bowl each time as water will destroy the coating. The end of each small batch usually resulted in at least one "ugly" ball, so that was set aside for placating the kitchen invaders/myself.

Step 6: Ever the one to carry a theme, I melted some chocolate and made little horseshoes on top of each ball. Too cute! And tooooo yummy--I'm in red velvet overload!

Thursday, March 20, 2008
The best oatmeal cookies EVER
I promised you a yummy post today, did I not? Well, here is, hands down, the best oatmeal cookie recipe in the world. The original recipe was published in Cooking Light, and I've made a few modifications of my own. Some days I consider them practically health food, but then I do love a good cookie... Ingredients
3/4 cup all purpose flour (about 3 1/3 ounces)
1 cup regular oats
1/2 teaspoon baking soda
1/4 teaspoon salt
3/4 cup packed brown sugar
1/4 cup butter, softened
1 teaspoon vanilla extract
1 large egg
1/2 cup dates, chopped
plus:
3/4 dried cranberries and 1/3 cup white chocolate chips
OR
3/4 cup raisins and 1/3 cup cinnamon chips (Hershey's makes them)
OR
your own combination of fruit, chips and/or nuts
Preparation
Preheat oven to 350°.Lightly spoon flour into a measuring cup; level with a knife. Combine flour, oats, baking soda, and salt; stir with a whisk. Place sugar and butter in the bowl of a stand mixer; beat at medium speed until well blended (about 3 minutes). Add vanilla and egg; beat well. Mix in chopped dates. Gradually add flour mixture, beating until blended. Add fruit and chips combo; beat at low speed just until blended.
Drop dough by tablespoonfuls 2 inches apart onto baking sheets coated with cooking spray. Bake at 350° for 12 minutes or until lightly browned. Remove from oven; cool on pan 1 minute. Remove cookies from pan; cool completely on wire racks.
Mmmmm, cookies.....
Subscribe to:
Posts (Atom)


 Posts
Posts